Building SweetFriend in 36 Hours
In my latest project, SweetFriend, I created a comprehensive diabetes management app that helps users track their glucose levels, log meals and exercises, and receive personalized insights from LLMs. This post details the technical aspects of the project, focusing on the innovative integrations and the architecture that powers SweetFriend. I built this project at the PennApps hackathon, the demo site can be found here, the GitHub repo here, and the DevPost blog here.
Technologies and Integrations
SweetFriend utilizes an array of technologies and external APIs to deliver a seamless user experience:
- We used React for building the frontend user interfaces, enabling dynamic and interactive graph visualizations for glucose levels.
- Flask was chosen for the backend, serving the API and handling the business logic.
- For data storage, we opted for MongoDB due to its flexibility in schema design and efficient handling of user logs and health data.
- One of the standout features of SweetFriend is its integration with the Dexcom API, allowing users to import real-time glucose data from their Dexcom devices. This integration is vital for providing continuous glucose monitoring and timely insights.
- To enhance the AI capabilities, we leveraged Tune Studio for vision model inference using GPT-4o, estimating carbohydrate content from food images.
- Cerebras was utilized for super-fast AI chatbot inference, enabling natural and responsive conversations with users.
- For notifications and alerts, we integrated Twilio, ensuring timely communication about critical health metrics like glucose levels.
Technical Challenges and Solutions
Environment Configuration
We needed to manage configurations for different environments, including local development and Vercel deployment. The Flask application checks if it’s running on Vercel using an environment variable and adjusts its configuration accordingly:
if os.environ.get('VERCEL', None) != "True":
    app.config.from_file('config.json', load=json.load)
else:
    # Read configurations from environment variables
    app.config['TWILIO_AUTH_TOKEN'] = os.environ['TWILIO_AUTH_TOKEN']
    # Other environment-specific configs
User Authentication and Data Security
We implemented user authentication using hashed passwords and sessions. Flask’s check_password_hash and generate_password_hash functions ensure that user passwords are securely stored and verified.
from werkzeug.security import check_password_hash, generate_password_hash

@app.route('/api/user_login', methods=['POST'])
def user_login():
    username = request.form['username']
    password = request.form['password']
    user = db.users.find_one({'username': username})
    if user and check_password_hash(user['password'], password):
        session['username'] = username
        session['user_id'] = str(user['_id'])
        session['logged_in'] = True
        return redirect('/app/dashboard')
    else:
        return redirect('/')
Efficient and Secure API Endpoints
To ensure efficient and secure data retrieval, we implemented caching with Flask-Caching and used environment variables for API credentials. The Cache class also ensures that LLM outputs are cached to avoid requesting new guidance every time the user visits their dashboard, saving on API costs and serving time.
from flask_caching import Cache
cache = Cache(config={'CACHE_TYPE': 'simple'})
cache.init_app(app)

@app.route('/api/get_advice')
@cache.cached(timeout=60)
def get_advice():
    recent_glucose, recent_events, recent_logs = get_recent_data()

    recent_glucose = [{'time': x['system_time'], 'glucose_value': x['glucose_value']} for x in recent_glucose]
    recent_events = [{'time': x['system_time'], 'event_type': x['event_type'], 'value': x['value']} for x in recent_events]

    context = f"Recent glucose readings (mg/dL): {recent_glucose}\nRecent events: {recent_events}\nRecent logs: {recent_logs}\n\n"

    # ... get response based on context from Cerebras
Image Analysis for Meal Logging
We developed an endpoint for analyzing meal images using AI models. This is a significant improvement over existing glucose management apps, which require manually entering the carbohydrate values of meals the user has eaten. This causes friction in the management process which can lead to the user entirely missing or delaying meal entry. In addition, users aren’t always accurately entering the carbohydrate value of their meals. To use GPT-4o to analyze images, the uploaded image is converted to a base64 string and sent to the Tune Studio API for inference:
@app.route('/api/analyze_image', methods=['POST'])
def analyze_image():
    if 'file' not in request.files:
        return jsonify({"error": "No file uploaded"}), 400
    image = request.files['file']
    base64_image = base64.b64encode(image.read()).decode('utf-8')
    # Send to Tune Studio for analysis and return results
We found that performance improves when giving the model a chance to think about what’s in the image, then to return a JSON object of the carb values. We first analyze and break down the image using this system and user prompt:
SYSTEM:
You do not use markdown headers or bolding, just lists. You are helping diabetes patients estimate the number of carbs in their meal so they can plan and monitor their glucose levels accordingly.

USER:
First, analyze the image and describe what food items are present. Then, break down the ingredients and estimate the carbs of each ingredient in grams, then calculate the total carbs and give the name of the meal.
Then, the output of this is appended to the current conversation log. Then, we prompt the model again using this message:
Using your estimates, fill the structured output JSON with the values. Only output valid JSON according to the schema. Only output for the meal total, one entry. Do not use code blocks or anything to surround json. Meal carbs must be in grams. Write in following format:
{
    "meal_name": {"type": "string"},
    "total_carbs": {"type": "number"}
}
In Tune Studio’s API, we can prompt the model to answer in this format using the "guided_json" parameter in the API request:
"guided_json": {
    "type": "object",
    "properties": {
        "meal_name": {"type": "string"},
        "total_carbs": {"type": "number"}
    }
},
Then, we return the JSON to populate the fields in the meal entry interface.
Real-Time Notifications
Using Twilio, we set up real-time notifications to alert users about critical glucose levels:
@app.route('/api/twilio_send')
def twilio_send():
    message = twilio_client.messages.create(
        from_='number',
        body='SweetFriend: Your glucose level is low and falling. Have a snack with around 15-20g of carbs.',
        to='number'
    )
    return jsonify({'status': 'message sent', 'message_sid': message.sid})
When fully developed, our app would automatically notify the user with actionable steps when their glucose levels have fallen to dangerously low or high levels. In the future, this could also be integrated with remote patient monitoring to alert healthcare providers or caretakers when action must be taken.
Frontend Development
We built an intuitive user interface using React, incorporating various components for registration, login, and dashboard functionalities. Below are some of the highlights:
Dynamic Dashboard
The dashboard displays glucose readings and AI-generated suggestions, updating in real-time. We used useEffect to fetch data and update the state:
import { useState, useEffect } from "react";

function Dashboard() {
    const [glucoseReadings, setGlucoseReadings] = useState([]);
	const [aiSuggestion, setAiSuggestion] = useState("Random AI suggestions will be displayed here...");

    useEffect(() => {
        const fetchGlucoseData = async () => {
            try {
                const response = await fetch("/api/get_glucose");
                const data = await response.json();
                setGlucoseReadings(data);
            } catch (error) {
                console.error("Error fetching glucose data:", error);
            }
        };

        const fetchAdvice = async () => {
            try {
                const response = await fetch("/api/get_advice");
                const data = await response.json();
                setAiSuggestion(data.response);
            } catch (error) {
                console.error("Error fetching AI advice:", error);
            }
        };

        fetchGlucoseData();
        fetchAdvice();
    }, []);

    return (
        // simplified dashboard
        <div>
            <h1>Dashboard</h1>
            <div>
                {glucoseReadings.map((reading, index) => (
                    <p key={index}>Time: {reading.systemTime}, Value: {reading.value}</p>
                ))}
            </div>
            <p>{aiSuggestion}</p>
        </div>
    );
};
Using Chart.js, we visualize the glucose data alongside the logged user events so the user can see associations between exercise, meals, and glucose level. This is another improvement upon current glucose monitoring apps, which only show the uncontextualized glucose level.
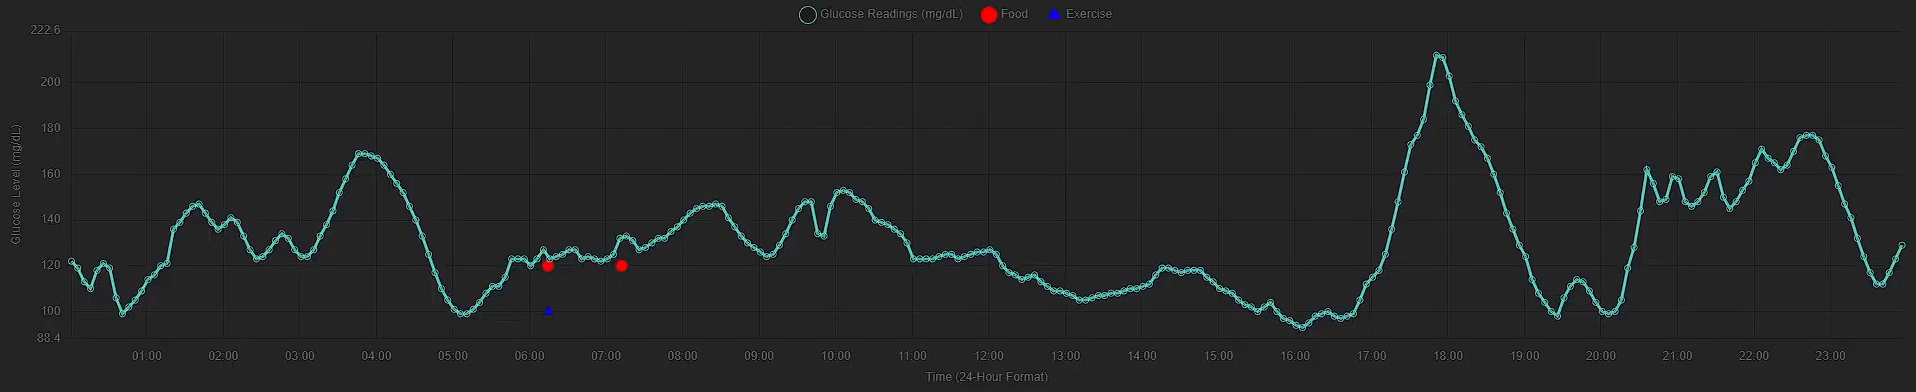
We also added a feature that allows the user to click on the graph to add logs directly from the dashboard for the time selected, further simplifying the data entry process.
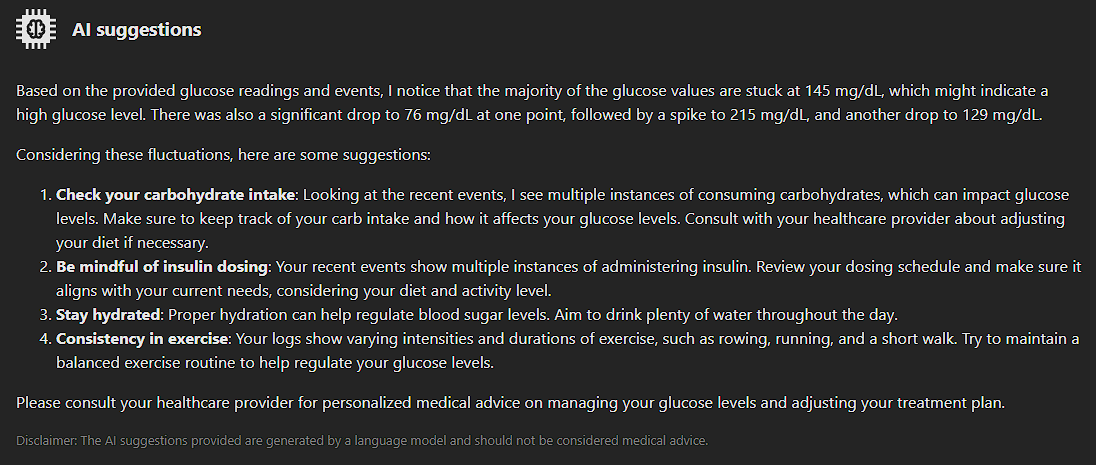
The past 24 hours of user data is also filtered and passed to the Cerebras API, using Llama-3.1-70b. This provides instant results that are more convient for the user. The LLM is prompted to avoid giving medical advice, and to instead give general actionable steps or insights based on recent data.
Finally, the most recent logs are also available through the dashboard, allowing users to get quick access to change their logs or star them. Starring logs allows users to mark logs that may be anomalous or that they wish to report to their healthcare provider, as they can filter their logs to instantly get a list of starred logs.
Image Upload for Meal Logging
Logging carbohydrate intake and exercise is critical for managing glucose levels. We let users do that easily through our log page:
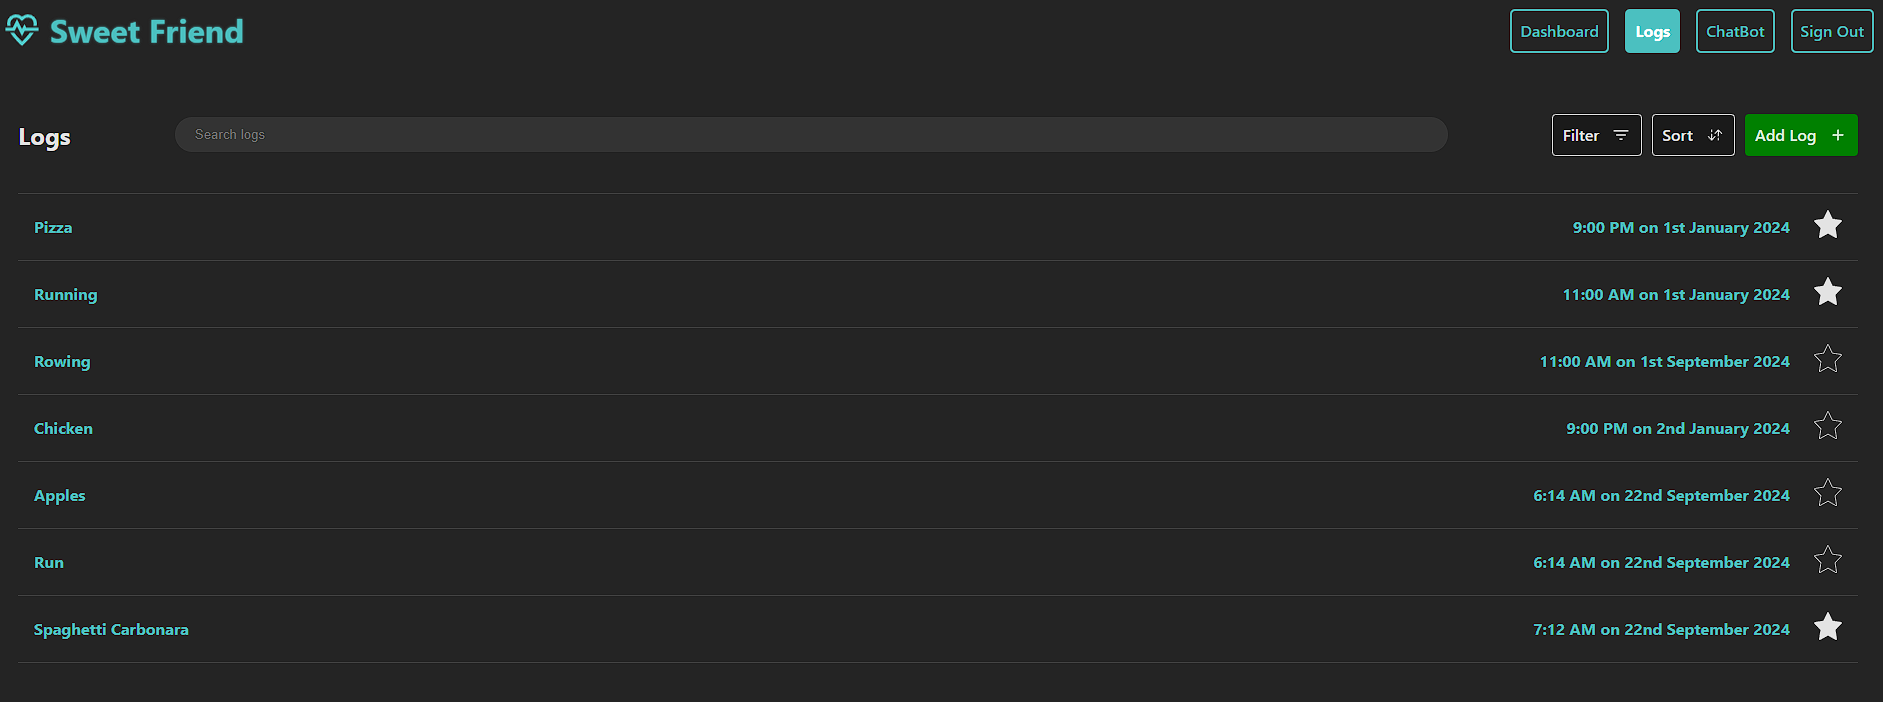
The page has the ability to search logs, filter, and sort them. We implemented this on the front end after querying for all the logs once:
function Log() {
    // Handle sorting items
	const sortItems = () => {
		let sortedItems = [...items];
		if (sortOrder === "nameAsc") {
			sortedItems = sortedItems.sort((a, b) => a.name.localeCompare(b.name));
		} else if (sortOrder === "nameDesc") {
			sortedItems = sortedItems.sort((a, b) => b.name.localeCompare(a.name));
		} else if (sortOrder === "dateAsc") {
			sortedItems = sortedItems.sort((a, b) => a.timestamp - b.timestamp);
		} else if (sortOrder === "dateDesc") {
			sortedItems = sortedItems.sort((a, b) => b.timestamp - a.timestamp);
		}
		setItems(sortedItems);
		setShowSort(false); // Close sort dialog after sorting
	};

	// Handle filtering items by type or starred
	const applyFilters = () => {
		let filteredItems = allItems;

		if (!filters.food) {
			filteredItems = filteredItems.filter(
				(item) => item.type.toLowerCase() !== "food"
			);
		}
		if (!filters.exercise) {
			filteredItems = filteredItems.filter(
				(item) => item.type.toLowerCase() !== "exercise"
			);
		}
		if (filters.starred) {
			filteredItems = filteredItems.filter((item) => item.starred);
		}

		setItems(filteredItems);
		setShowFilters(false); // Close filter dialog after applying filters
	};

	// Handle checkbox filter changes
	const handleFilterChange = (e) => {
		const { name, checked } = e.target;
		setFilters((prevFilters) => ({ ...prevFilters, [name]: checked }));
	};

	// Handle radio button sort changes
	const handleSortChange = (e) => {
		setSortOrder(e.target.value);
	};
}
The image upload feature lets users log meals by using LLMs to analyze photos of their food. Here’s a snippet of the image upload component that posts to the /api/analyze_image endpoint shown earlier:
import { useState, useEffect } from "react";

const handleImageUpload = async (e) => {
    e.preventDefault(); // Prevent default form submission
    setIsLoading(true); // Start loading state

    const formData = new FormData(e.target);

    try {
        const response = await fetch("/api/analyze_image", {
            method: "POST",
            body: formData,
        });
        const data = await response.json();

        // Assuming API returns { meal_name, total_carbs, reason }
        setName(data.meal_name || ""); // Set the name from AI response
        setTotalCarbs(data.total_carbs || ""); // Set the total carbs from AI response
        setReason(data.reason || ""); // Set the reasoning from AI response
        setIsLoading(false); // Stop loading state
    } catch (error) {
        console.error("Error uploading image:", error);
        setIsLoading(false); // Stop loading on error
    }
};
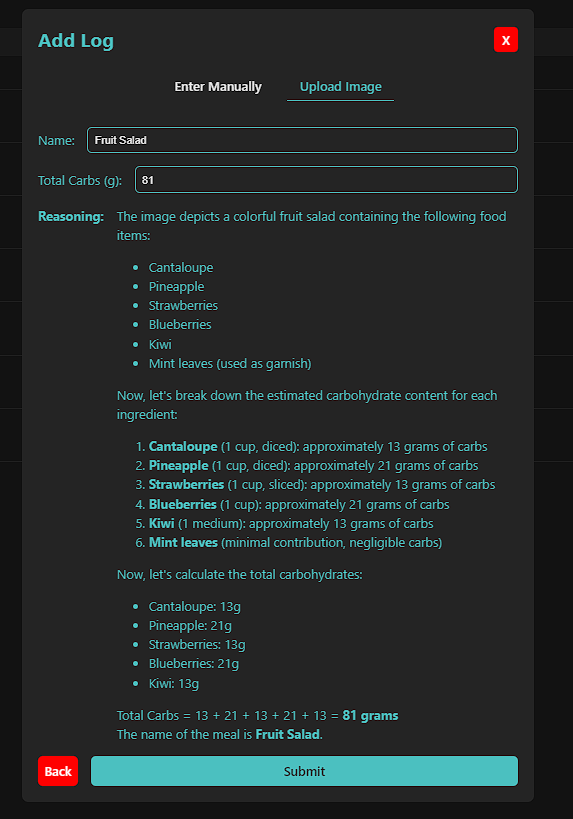
Once the image is uploaded, the modal is given the LLM-generated description of the food and is populated with the values returned in the JSON object. This gives the user reasoning on how carbs are calculated for each ingredient, which makes it easy to adjust for major errors. The name of the meal is also populated and editable.
Deployment and Configuration
Vercel Deployment
For seamless deployment, we configured Vercel to handle both the frontend and backend:
{
    "rewrites": [
        { "source": "/api/(.*)", "destination": "/api/app" },
        { "source": "/login", "destination": "/api/app" },
        { "source": "/callback", "destination": "/api/app" },
        { "source": "/(.*)", "destination": "/index.html" }
    ]
}
The generated React website (at /index.html) is the destination for all paths, except for API-related paths, whose destination is /api/app.
Local Development
For local development, we used Vite’s proxy feature to route API calls to the Flask server running on localhost:5000:
// vite.config.js
export default {
    server: {
        proxy: {
            '/api': {
                target: 'http://localhost:5000',
                changeOrigin: true,
            }
        }
    }
}
Conclusion
SweetFriend is a significant step forward in diabetes management, combining real-time data from Dexcom devices with user input. The user is able to authenticate usage of the Dexcom API with Sweetfriend, allowing for real-time glucose data to appear in the dashboard. Logging fitness and carb intake is made easy using AI-powered image recognition. The user sees all data at their dashboard, alongside general advice on how they are managing their glucose throughout the day. An additional chatbot page allows the user to get more specific advice and ask questions, such as how to prepare future meals or plan their fitness.
Future steps for SweetFriend would include fitness tracker integration to make activity logging even easier, remote patient monitoring to enhance patient outcomes, and improved user experience through notifications, mobile app, etc.
Below is a demo of the website at the time of the hackathon, feel free to also try it here using username and password admin.