Building a Smart Food Inventory App with Palantir Foundry
I’ve recently accepted a position as a Software Engineering Intern at Palantir Technologies and made this project with Build with AIP. Palantir is offering a free developer tier for their Foundry and AIP products, letting developers learn the technology.
Personally, I’ve had to supplement my meal plan as a student with meals cooked in my dorm. With a kitchen in my room this year, I felt more ambitious in making meals, but with this came the trouble of having to deal with expiration dates, defrosting, and planning meals. I’ve trashed countless eggs after putting off making a meal with them for too long, my bacon has been waiting in the freezer for its time to shine, and I forgot about the lemons at the bottom of my fridge until they turned black. Using Foundry, I implemented a food inventory app that helps students manage their dorm food inventory, generate recipes, and minimize food waste.
This pipeline handles hundreds of food items and tons of metadata in milliseconds. In this post, I’ll walk through the project, the tools I used to accomplish it, and the challenges along the way.
The Problem
As a student, managing food inventory can be challenging:
- Buying food we already have.
- Forgetting about perishables until they expire.
- Struggling to create balanced meals with the ingredients on hand.
I had a few key solutions in mind to solve these challenges:
- Automatically track purchases via Target receipts.
- Monitor expiration dates with alerts.
- Generate AI-powered recipes using ingredients on hand.
- Reduce waste by prioritizing soon-to-expire items.
As a student at Penn State, I made the vast majority of my purchases at Target, and so I decided to implement my solution with the following:
- Target API: To fetch receipt data and items by receipt.
- Python and Pandas: To transform receipt data and create the dataset for import to Foundry.
- Palantir Foundry: For building the data pipeline, managing ontologies, and creating the app’s interface.
- Palantir AIP and GPT-4o: To generate recipes based on ingredients present and goals.
Implementation
Data Extraction and Preparation
Initially, I thought of using OCR on receipts to handle grocery data, but this was a complete nightmare. Receipts often didn’t contain sufficient useful info to determine what products were.
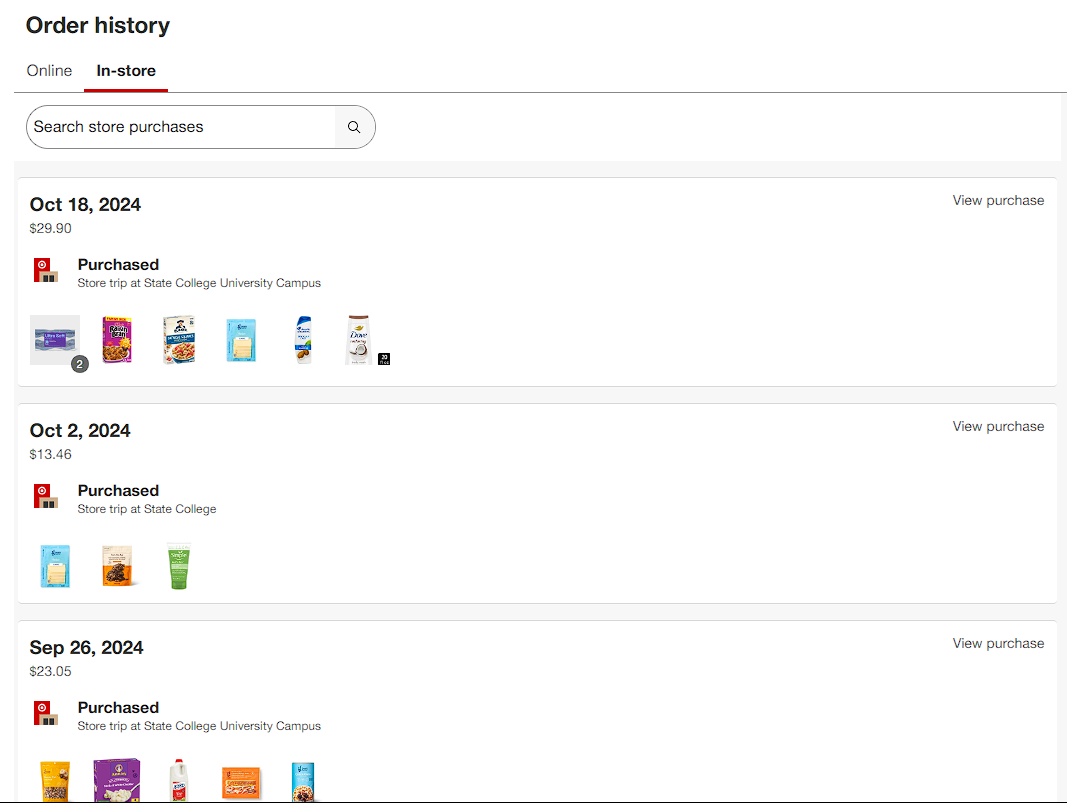
However, Target conveniently tracks the history of all in-store orders if you use your number for their rewards service. Logging into Target, we can see a list of purchases made:
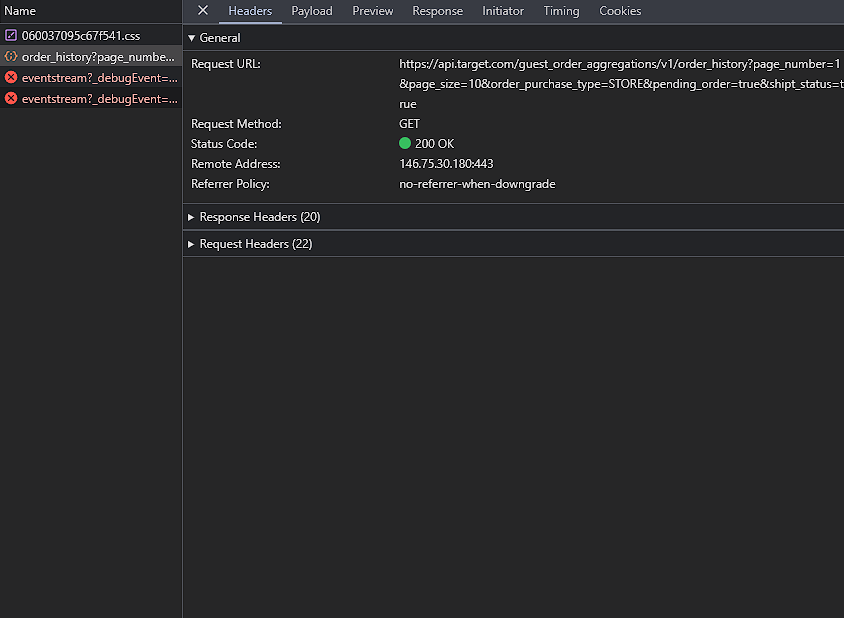
Ideally, we would leverage a public API to get all of the items for each order, but Target has no such API. I used Chrome’s developer tools to inspect what data is being sent when navigating to the order history page, and see a request under https://api.target.com/guest_order_aggregations/v1/order_history. We can use the developer tools to inspect the request parameters as well as the returned payload to get an idea of how to use this API.
NB: I only went through this process as many times as necessary, getting info on all items ~twice. The laws for web scraping are complex, and it’s responsible to not hammer Target’s servers in this case and ethically request data. Being careful with scraping and respecting content scraped, respecting the owner of the content, and requesting data at a reasonable rate are all more important when a public API isn’t provided. Ideally, a User-Agent string would be provided with these requests, but their scope was highly limited. You can find more info on ethical scraping here.
Using an online JSON viewer, we can easily explore the returned schema from the Target API and see that receipts are returned for each purchase along with items and their thumbnails.
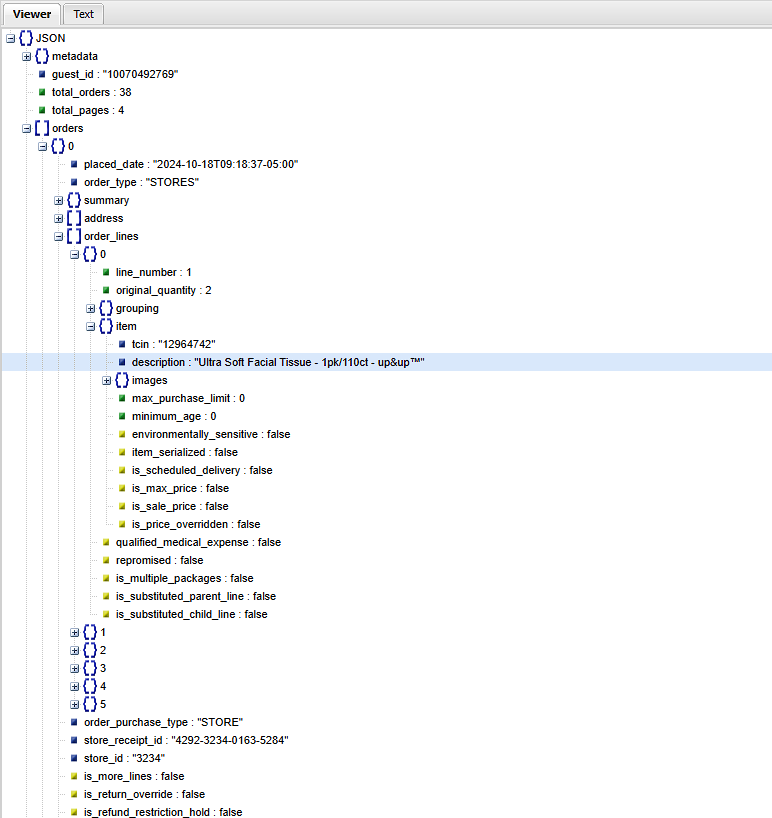
However, this JSON object doesn’t contain information about the quantity or price, which would be helpful in the final product. It also has the following parameters, which restrict it to only displaying the 10 most recent receipts:
page_number: 1
page_size: 10
order_purchase_type: STORE
pending_order: true
shipt_status: true
To adjust to this limitation, we use the total_pages value of the JSON object to tell how many pages to request and iterate the page_number parameter through the number of pages. I investigated the API further by opening the link to one of the orders.
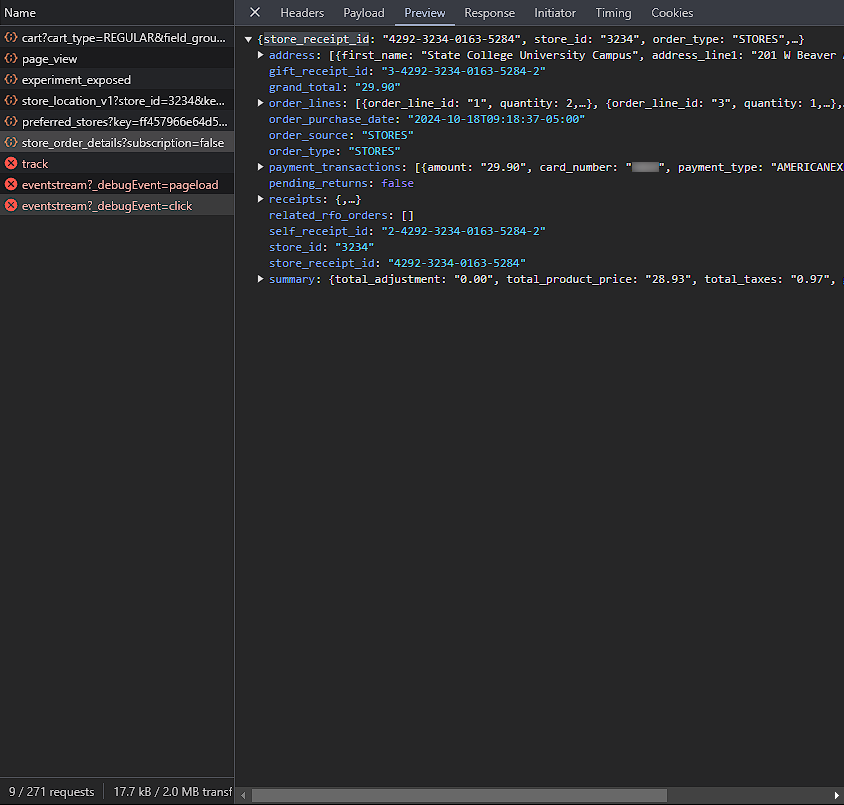
Here, we see a request to https://api.target.com/guest_order_aggregations/v1/<store_receipt_id>/store_order_details, where <store_receipt_id> is the ID of the receipt from the order_history request we made earlier (in this case, 4292-3234-0163-5284). The JSON returned from this request contains all the information we need about each item, in a nested object format.
To make these API requests through a program, we need to authorize access to the API. Simply running curl on the API endpoint results in:
>curl https://api.target.com/guest_order_aggregations/v1/order_history
{"message":"Invalid Key","errors":[{"resource":"Go-Proxy","field":"","reason":"no API key found in request"}]}
Inspecting the request headers in Chrome, we can try to mimic the original request to authorize our use of the API. One of the request headers is x-api-key, which we can add to the curl request as follows:
>curl https://api.target.com/guest_order_aggregations/v1/order_history -H "x-api-key: <YOUR API KEY FROM DEV TOOLS>"
{"message":"Unauthorized","errors":[{"resource":"Go-Proxy","field":"","reason":"[GSP] No authorization header, nor auth cookies found"},{"resource":"Go-Proxy","field":"","reason":"[ID2] token value missing or Authorization invalid"}]}
Now, we see that we are still missing something, although this is likely a request cookie rather than another header. We can see the cookies sent by accessing the cookies tab in the developer tools:
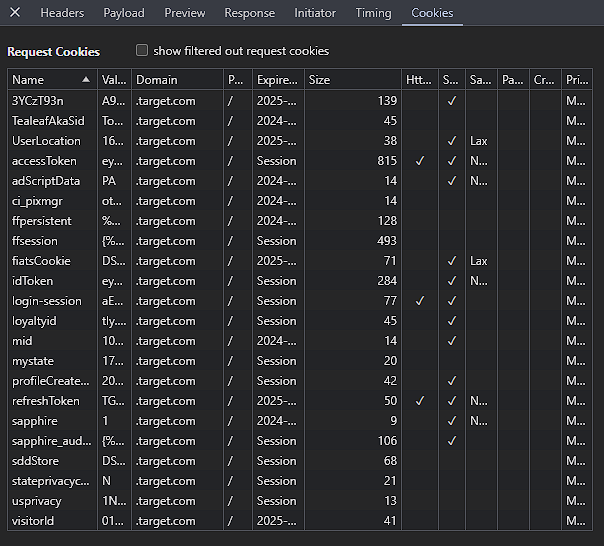
My instinct was to use the accessToken cookie to authorize the request, and I sent this with the request in curl:
>curl https://api.target.com/guest_order_aggregations/v1/order_history -H "X-Api-Key: <YOUR API KEY FROM DEV TOOLS>" -H "Cookie: accessToken=<YOUR ACCESSTOKEN COOKIE>"
{"metadata":{"total_time":55,"guest_type":"P"},"orders":[],"request":{"page_number":1,"page_size":10,"shipt_status":false,"pending_order":false}}
We can see we get a valid response once this cookie is included, but we need to note that this cookie expires once the user session ends and that we would need to log in again to get a new cookie once the old one is no longer valid. However, we can ignore this for now and make requests through a simple Python program:
import requests

API_URL = 'https://api.target.com/guest_order_aggregations/v1'
ORDER_HISTORY_ENDPOINT = '/order_history'
ORDER_DETAILS_ENDPOINT = '/{store_receipt_id}/store_order_details'

PARAMS = {
    'page_size': 10,
    'order_purchase_type': 'STORE',
    'pending_order': 'true',
    'shipt_status': 'true'
}

HEADERS = {
    'X-Api-Key': '<YOUR_API_KEY>',
    'Cookie': 'accessToken=<YOUR_COOKIE>'
}

def fetch_all_receipts():
    receipts = []
    current_page = 1
    total_pages = None

    while total_pages is None or current_page <= total_pages:
        print(f'Fetching page {current_page}...')
        response = requests.get(API_URL + ORDER_HISTORY_ENDPOINT,
                                params={**PARAMS, 'page_number': current_page},
                                headers=HEADERS)
        response.raise_for_status()
        data = response.json()

        orders = data.get('orders', [])
        for order in orders:
            receipts.append(order['store_receipt_id'])

        if total_pages is None:
            total_pages = data['total_pages']

        current_page += 1

    return receipts
This program will fetch the first page using the default parameters and our headers. We only get the orders list from the returned JSON, which contains the receipt ID associated with it under the store_receipt_id field. We iterate through every order to get all the receipt IDs, which we can then use to get full receipt data. If we are on the first page, we also find the total pages of orders the user has through metadata, which tells us when to stop fetching new pages.
Next, we want to fetch all items from each receipt. While data unique to each item on the receipt is stored in objects within the order_lines list, some data, such as purchase date and location purchased are only given once for the whole receipt. Because I’d like to make a dataset of items bought that contains this information by object, I make sure to include this receipt-wide data in every item’s data. The item-by-item data is also highly nested, for example, the product type information for the first item on a receipt is under response['order_lines'][0]['item']['product_classificaton']['product_type_name']. We’d like all of this information to be flattened, so we can use the Python pandas library and the pandas.json_normalize function to flatten all of this data. For consistency, we will add all of the data into a Pandas DataFrame, which makes exporting easy through pandas.to_csv.
import pandas as pd
import html

def fetch_all_items(receipts):
    items = []
    items_df = []

    for receipt in receipts:
        response = requests.get(API_URL + ORDER_DETAILS_ENDPOINT.format(store_receipt_id=receipt),
                                params={'subscription': 'false'},
                                headers=HEADERS)
        response.raise_for_status()
        data = response.json()

        items = data.get('order_lines', [])

        for item in items:
            outer_data = pd.json_normalize({
                'order_purchase_date': data['order_purchase_date'],
                'address_line1': data['address'][0]['address_line1'],
                'city': data['address'][0]['city'],
                'state': data['address'][0]['state'],
                'zip_code': data['address'][0]['zip_code'],
                'store_receipt_id': data['store_receipt_id'],
                'store_id': data['store_id'],
                'grand_total': data['grand_total']
            })
            inner_data = pd.json_normalize(item)
            inner_data['item.description'] = inner_data['item.description'].apply(html.unescape)
            items_df.append(outer_data.join(inner_data))

    return pd.concat(items_df)
In this code, we fetch each reciept, and iterate through each item’s data, flattening the “outer data” (data that applies to the whole receipt) and “inner data” (data that is by item). Then, we also unescape the item’s description tag, which often has trademark or ampersand symbols that would render as its escaped version in Palantir Foundry. Finally, we can join the inner and outer data into a single row, and append the row to a DataFrame containing each item from each receipt.
One final thing I did before importing this data to Foundry was get the image data for each item. This provided a much cleaner look in the final workshop with the icon preview for each object. Under the flattened item data, the URL for each item was accessible under image_url = 'https:' + item['item.images.base_url'] + item['item.images.primary_image']. However, this URL pointed to an AVIF image, and seemed unsupported when I tried to use it in Foundry. I also tried to use URL-based image conversion from AVIF to PNG using Cloudinary, but this also didn’t render in Foundry. As a last resort, I downloaded the image for each icon and encoded it as a base64 string, which was finally rendered in Foundry.
import io
import base64
from PIL import Image

def get_images(items):
    print('Converting images...')
    base64_images = []

    for index, item in items.iterrows():
        if type(item['item.images.base_url']) is str: # some items don't have image
            image_url = 'https:' + item['item.images.base_url'] + item['item.images.primary_image']

            response = requests.get(image_url)
            response.raise_for_status()


            image = Image.open(io.BytesIO(response.content))


            with io.BytesIO() as png_output:
                image.save(png_output, format='PNG')
                png_data = png_output.getvalue()


            base64_image = base64.b64encode(png_data).decode('utf-8')
            base64_images.append(f"data:image/png;base64,{base64_image}")
        else:
            base64_images.append('')

    items['image_base64'] = base64_images
    return items
The code above converts the AVIF image to a PNG in memory, before encoding it in base64. We can use all the functions above to generate a CSV with all order data for a user:
if __name__ == '__main__':
    receipts = fetch_all_receipts()

    items = fetch_all_items(receipts)
    items = get_images(items)

    items.to_csv('receipt_items.csv')
Data Processing in Foundry
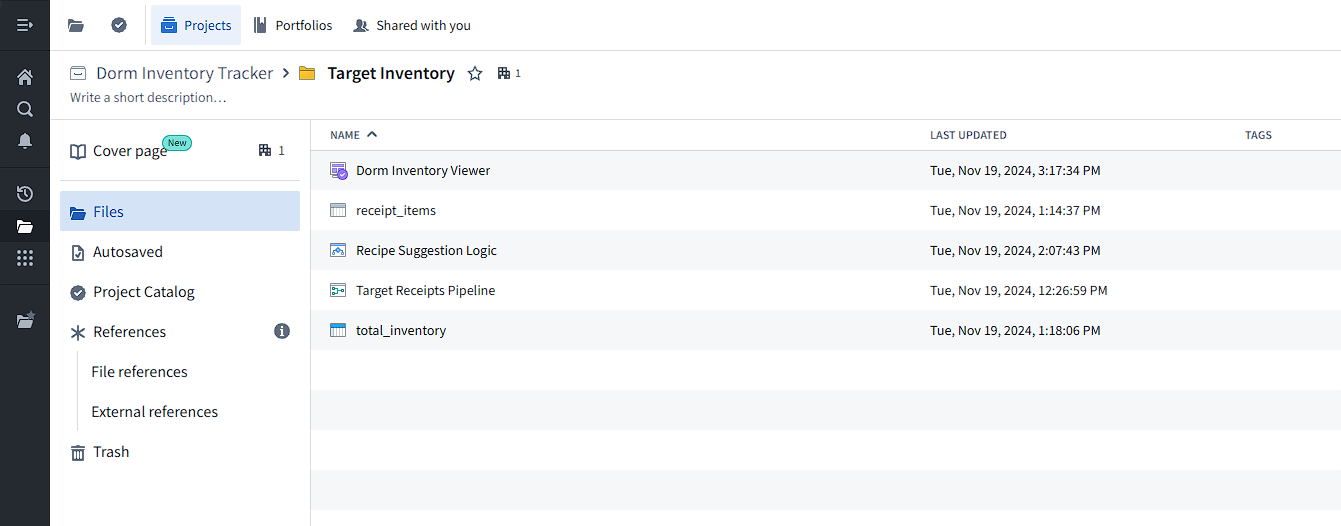
Below is a view of the full project in Foundry. To process data in Foundry, we first upload the receipt_items dataset, process it using the Target Receipts Pipeline into the total_inventory dataset, and then display the data using the Dorm Inventory Viewer workshop and suggest recipes using the Recipe Suggestion Logic.
To process data in Foundry, we first upload the CSV file, which creates a raw dataset.
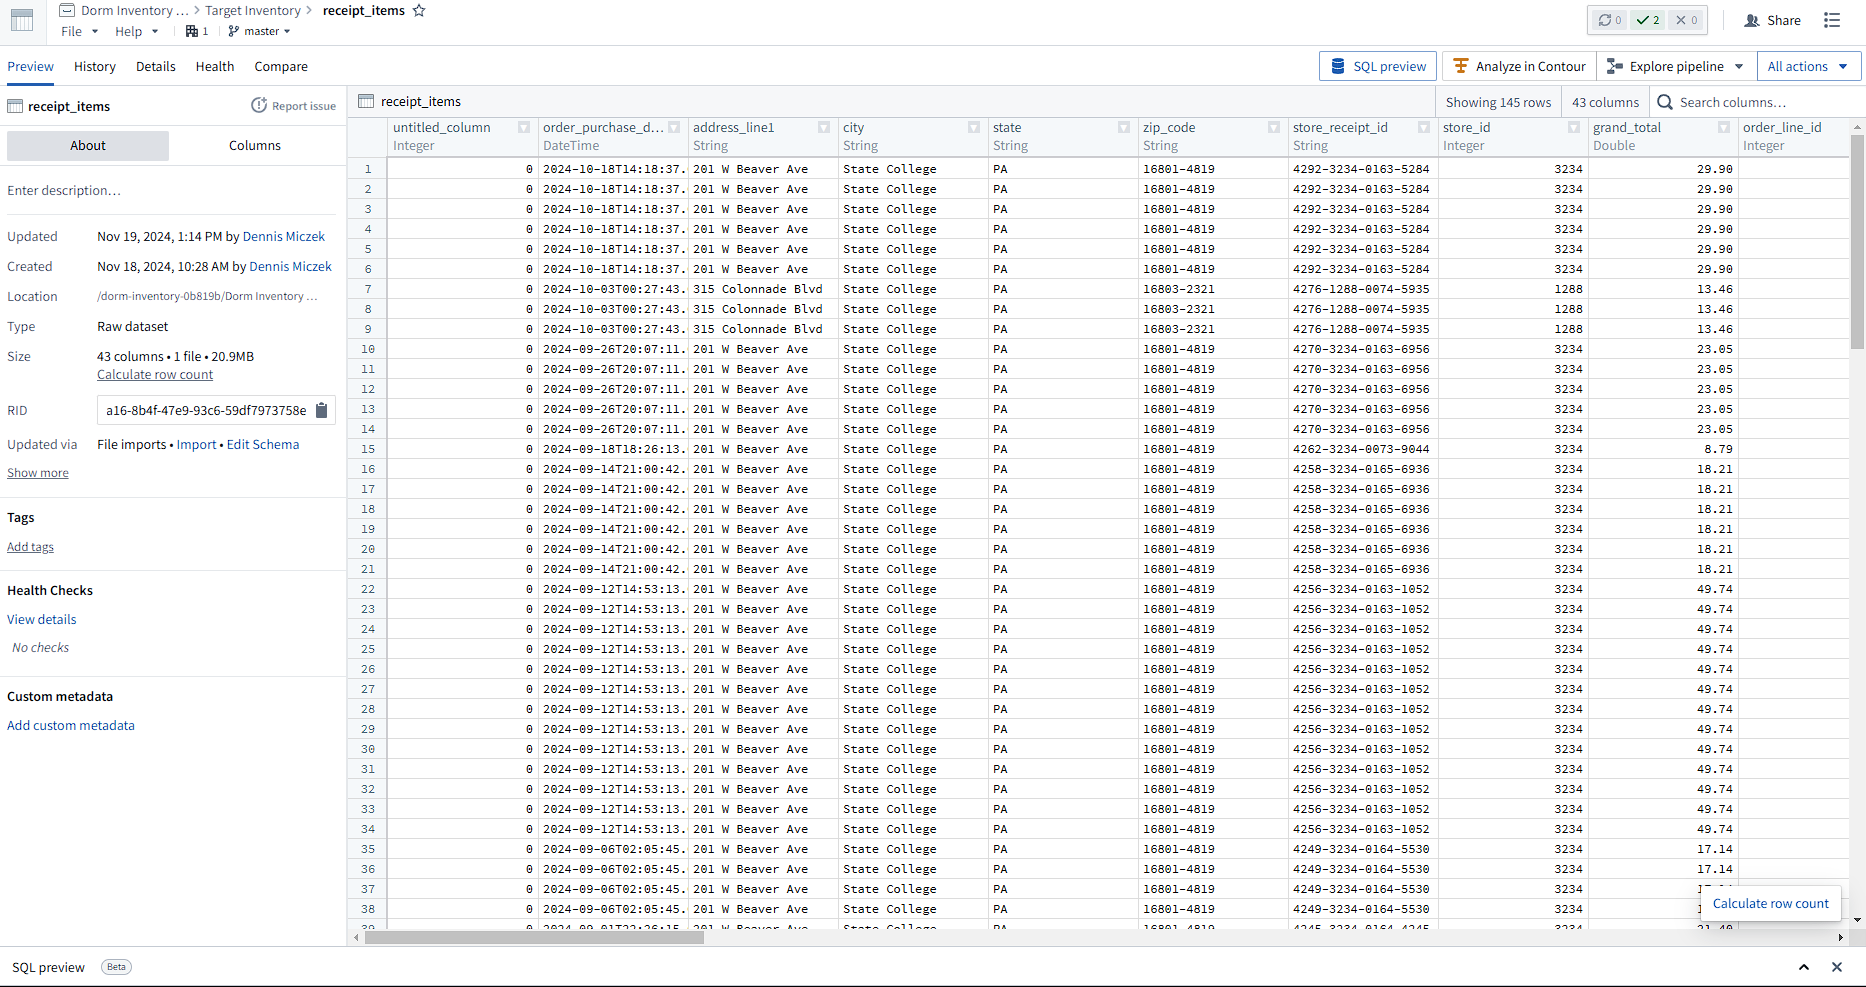
This dataset contains 43 columns, which we will drop and filter through, and all the necessary data for each item. In Foundry, we turn raw datasets into datasets usable for building programs through the Pipeline Builder.
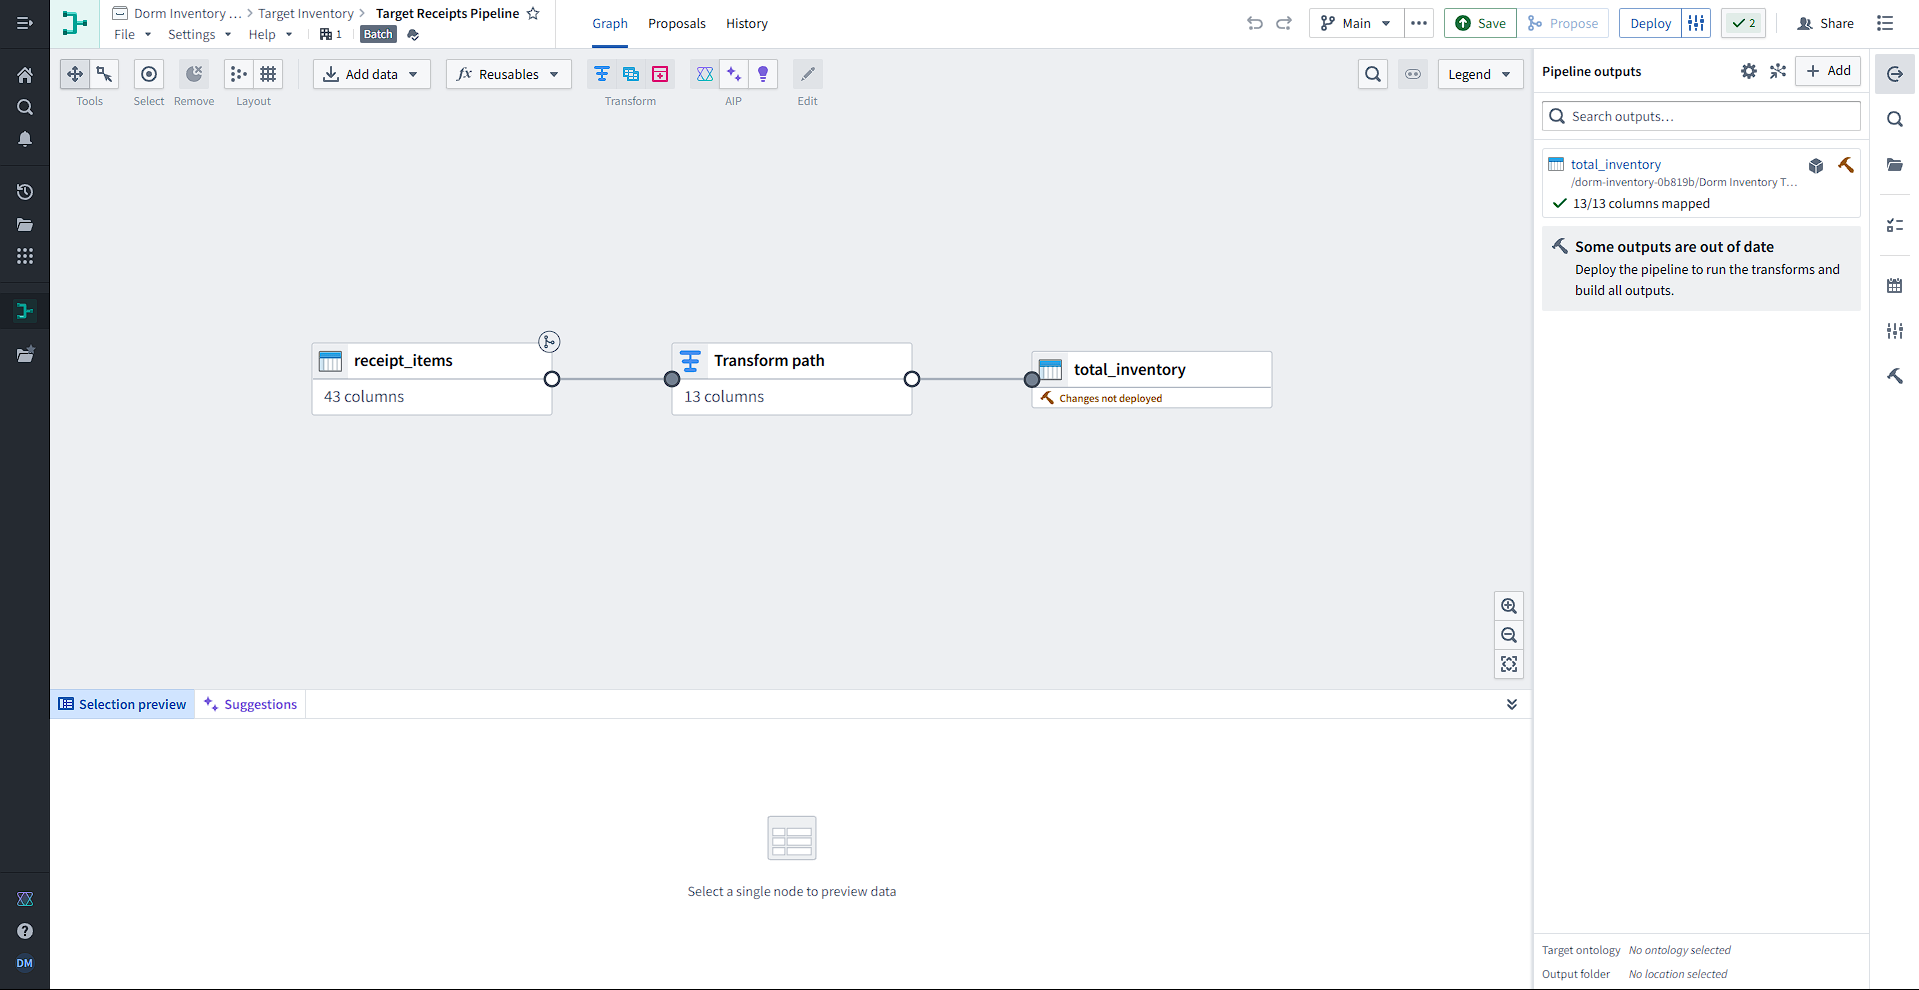
The inputs to each pipeline are tables (datasets), either imported from Foundry or manually entered. Then, tables can be joined, unioned, or transformed. Transformation paths consist of transforms, which can be picked from a list of 100+ functions. We use these functions to filter from 43 columns to only 13.
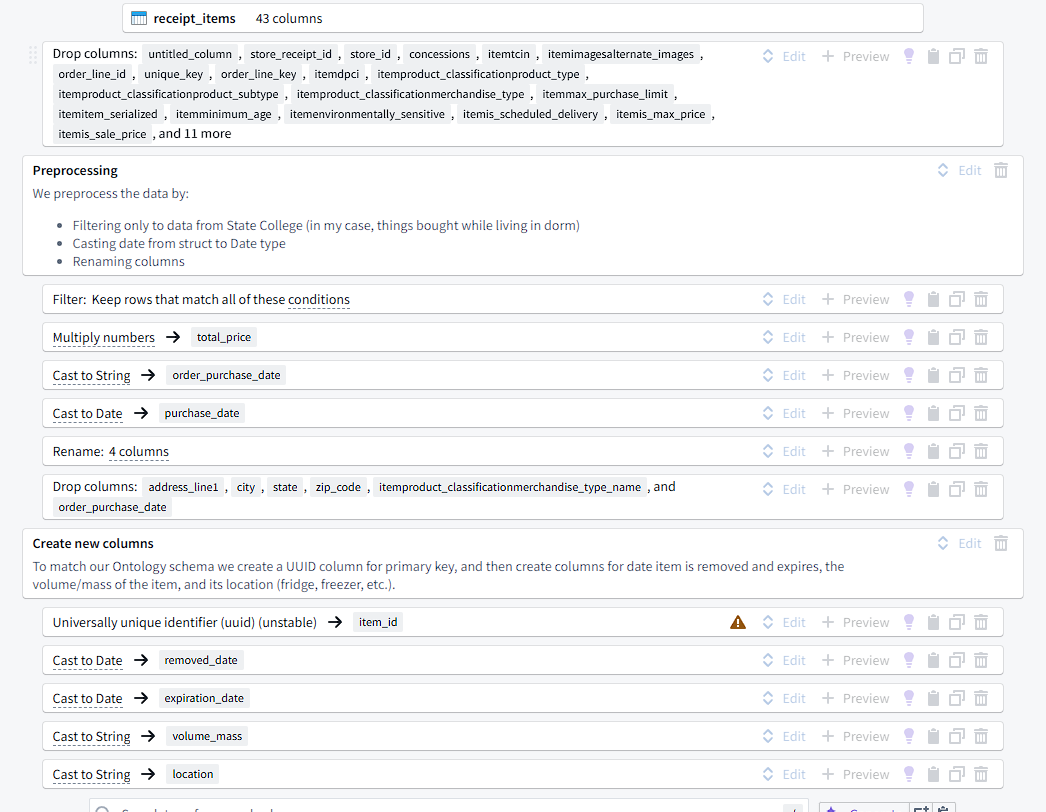
These transforms are highly configurable and changes can easily be previewed. Each of these transforms on the path consists of a function that takes some number of columns/expressions/values and uses its output to replace or create a new column. For example, we can create a new column for the total price of some goods by multiplying the numbers in itemunit_price and quantity.
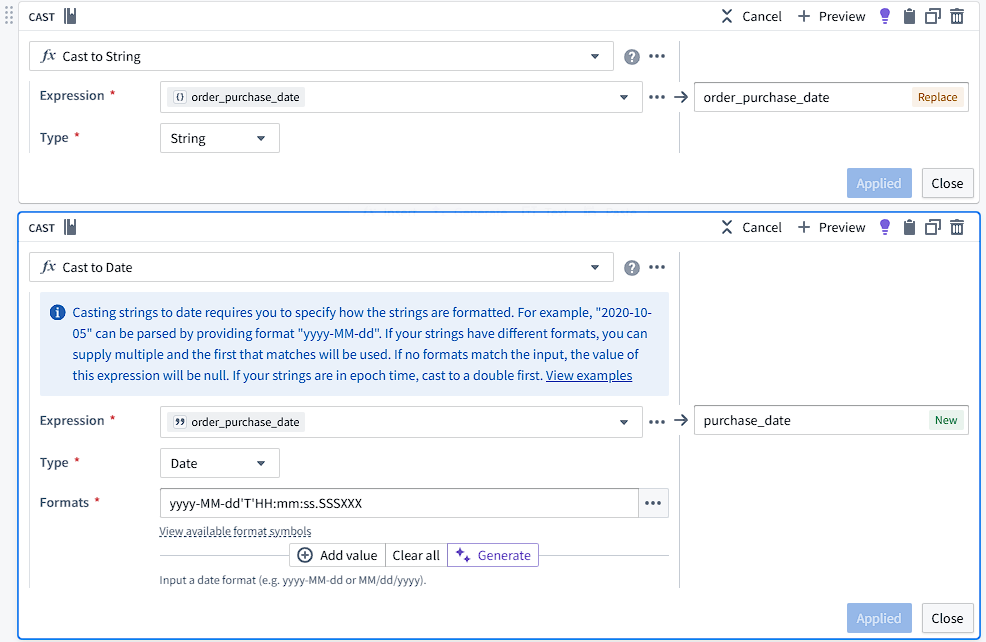
One particularly important piece of information is the purchase time and date. In the original CSV, the times appear as 2024-10-18T09:16:51-05:00, which includes the date, time, and timezone offset. From this, we can obtain timezone-specific data, but for the sake of this program, we will ignore timezones and only provide the user with local times. Foundry interprets these strings as a Struct{timestamp: Timestamp, offset: Integer}, which now has functions supporting field extraction (although these seem to be buggy right now). This is an issue when we make a Workshop interface later as Foundry offers specialized filter widgets to Timestamp and other types. To support this, I cast the structs to strings and then cast the string to a date timestamp based on a format string.
I also created a UUID column for support in the ontology later and created new columns using cast to X functions with no parameters.
Building the Ontology and AIP Logic
The previous steps in the pipeline create a dataset (as opposed to the “raw dataset” we imported) that can be used to create an Ontology using the Ontology Manager.
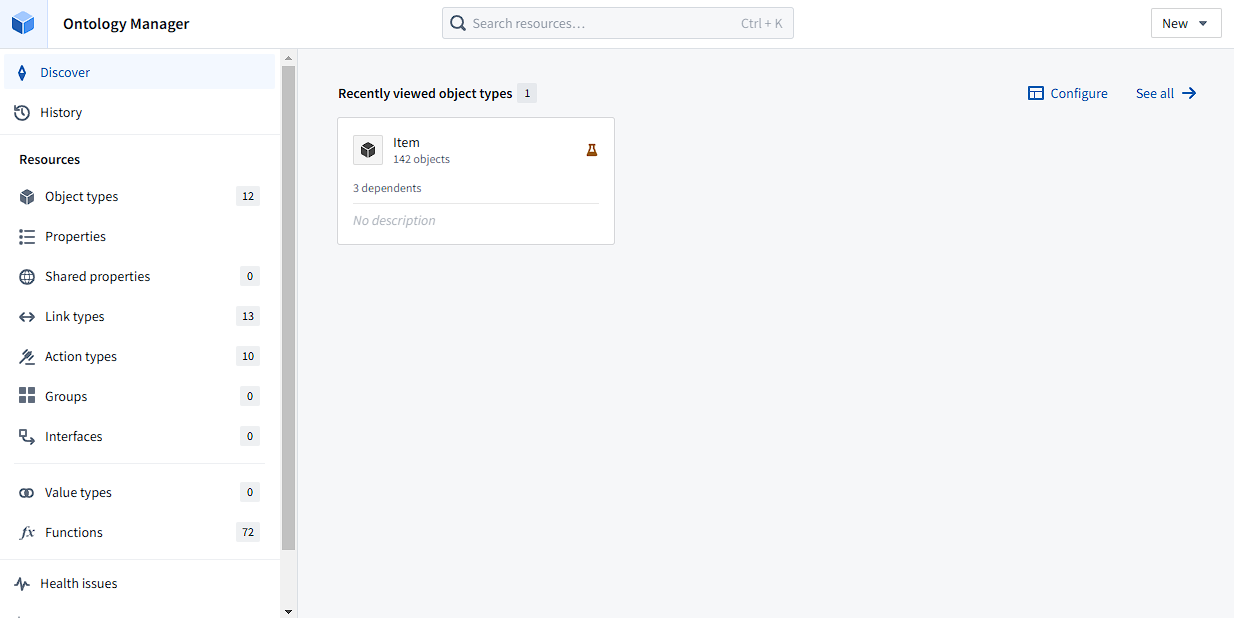
The Ontology uses the datasets imported into Foundry to create models of objects that represent their real-world counterparts. As an example, we use the “Item” object to represent any item bought from Target. The Ontology Manager app also allows for viewing which apps are reliant on an Ontology object, auditing changes made, creating automations, and analyzing object usage. The primary features that make the Ontology usable for operator-facing apps are the properties and actions.
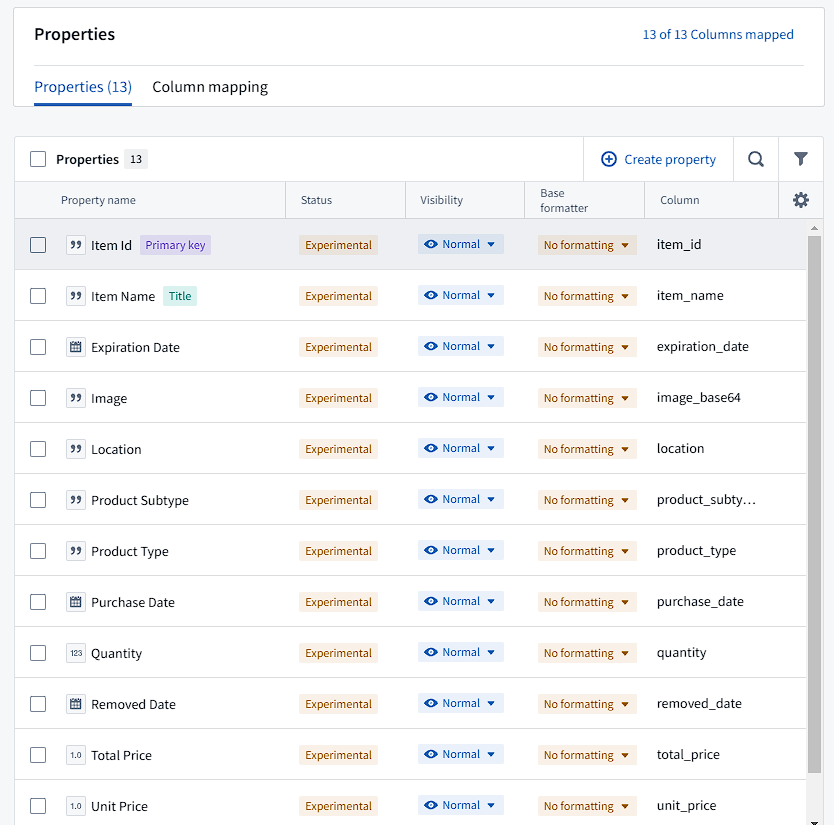
The properties I decided to use for the Item object are information that may be relevant to the user managing their dorm and cooking (quantity, expiration date), as well as price and purchase date data. These properties can be backed by a dataset or stream, and I map the columns from the previously created dataset to these properties. Then, when we want to edit these objects (eg. set an expiration date, remove from inventory) we can set up actions that precisely define how users may interact with the Ontology.
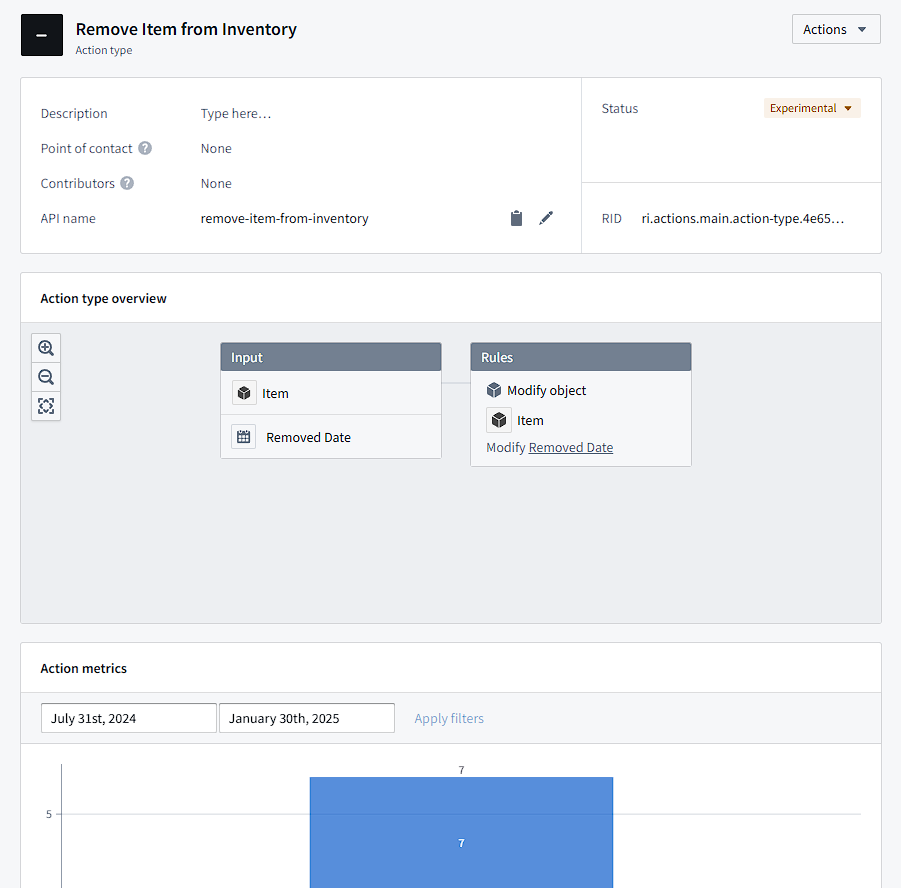
As an example, I have an action that removes items from the current inventory. To maintain a history of previous items we bought for potential data analysis, I set the default empty “Removed Date” property to the current date. Then, by default, the views in the app filter out objects that have their removed date set. Actions let you create forms for these specific changes, which can be useful if you only want the user edit certain properties and validate input.
Creating the Workshop
Making the Ontology is the final stop before data can be analyzed in dozens of ways. Foundry contains several apps that can all interact with your Ontology, and Workshop allows making high-quality applications to visualize and operate on data using a point-and-click editor.
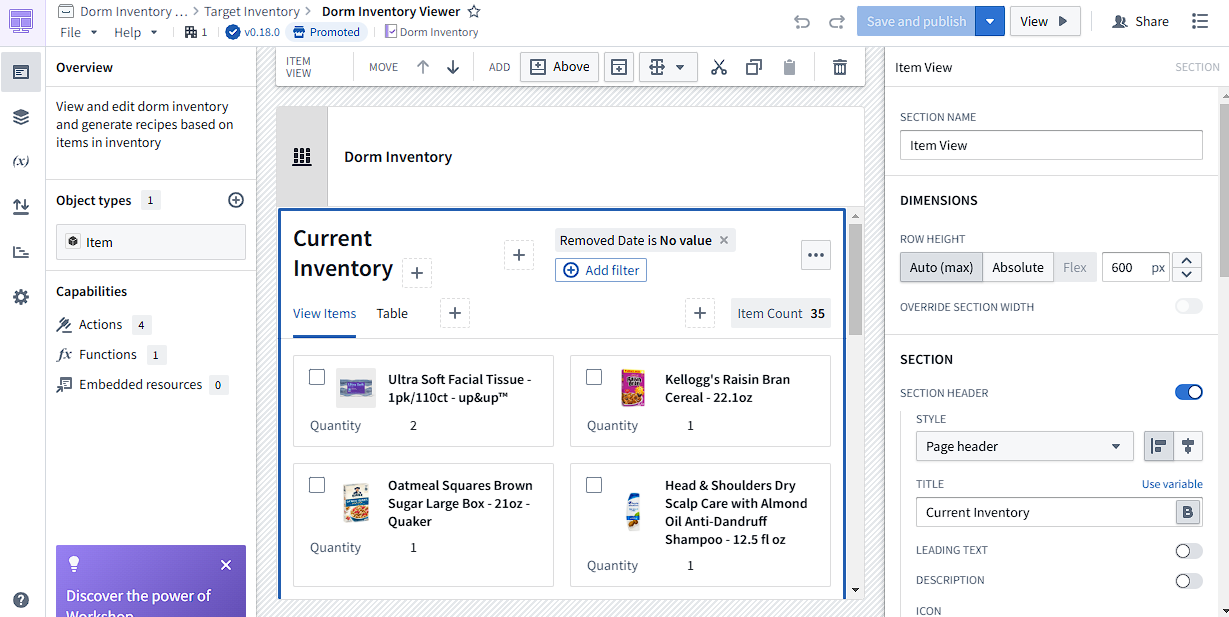
The app I created is a basic inventory manager for achieving my initial goals. Firstly, I created two different views for the items in inventory: item view and grid view. The item view uses the images generated in the preprocessing steps to generate previews, which can be very useful in managing the inventory, while the grid view allows for viewing more specific data. I then added filters that can filter on any property of the Item object and a button to remove items using the Remove Item from Inventory action. All of these components are “widgets” in Workshop, and can be dropped into the application and configured in many ways.
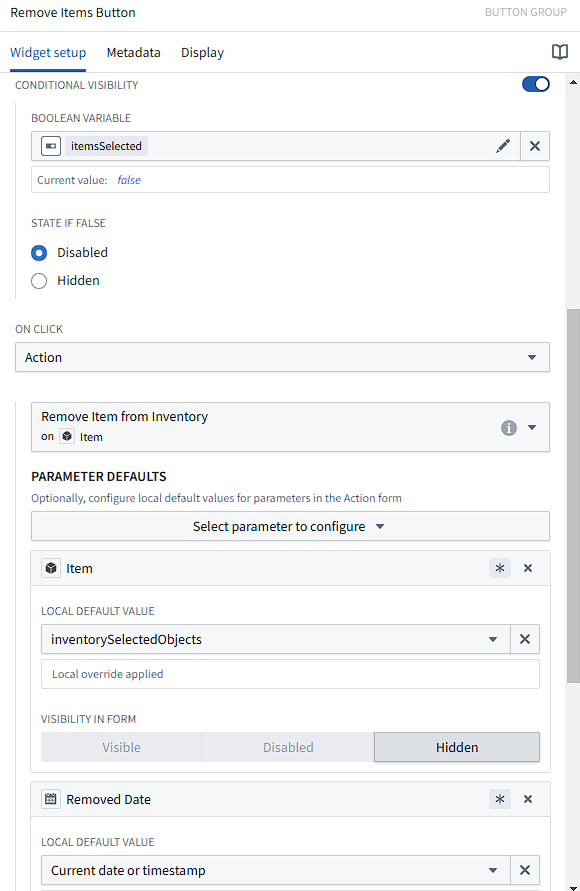
As an example, the “Remove Items” button was configured as shown above. Conditional visibility can be toggled using variables, which are global to the Workshop environment.
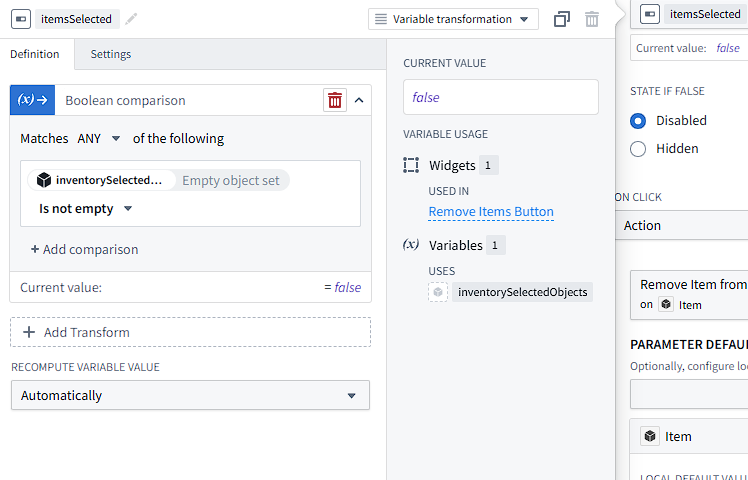
The object view, which uses checkboxes to mark selected objects, can be configured to output the selected items to a variable, which I named inventorySelectedObjects. Then, I use a “Variable Transformation” for the button visibility, which lets me define a new variable. From there, I added a transform called “Boolean comparison”, which outputs true if any conditions are matched, and set a condition that the inventorySelectedObjects object set is not empty. I can continue transforming the variable, but this is sufficient to show the button as disabled when the user hasn’t selected any objects to delete.
Finally, many things can be configured to happen when a button is clicked, but I made the button perform the action we defined earlier. Then, I can fill the form with variables from the workshop, such as inventorySelectedObjects and the current timestamp. Then, I can hide the form and immediately apply changes, since we prefilled all fields.
Separately, I added a standalone form that uses a “Create Item” action I defined earlier so that users can add their own items upon purchase. Typically, data that I showed earlier, like from the Target API, would come to Foundry as a stream, so that the datasets would be constantly updated. However, as I made this as a demo and did one-time processing (the auth cookies expire before data can be updated), I added this feature.
The final feature I added was recipe generation using AIP, Palantir’s AI platform. This widget uses the inventoryObjects variable from the complete inventory and the recipeGoals variable set by a textbox in the workshop to prompt an LLM for recipes to make.
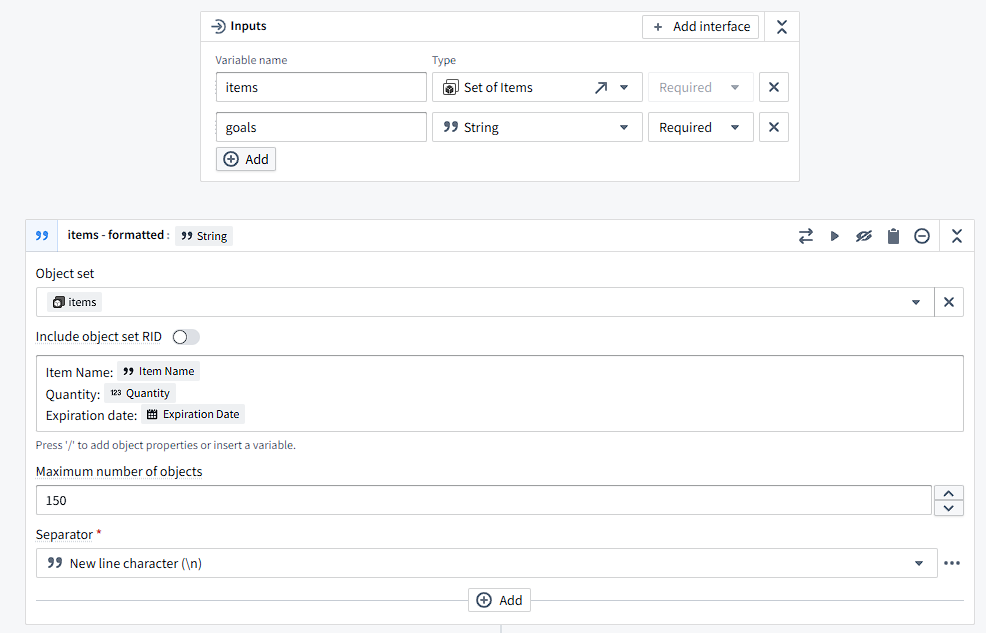
The above is an example of the start of an AIP Logic function, which defines interactions with LLMs. These interactions can enable LLMs to act on and edit Ontology objects and are highly configurable. In this example, I decided how to format each Item into a string using a string transform block, and included the properties relevant to creating a recipe.
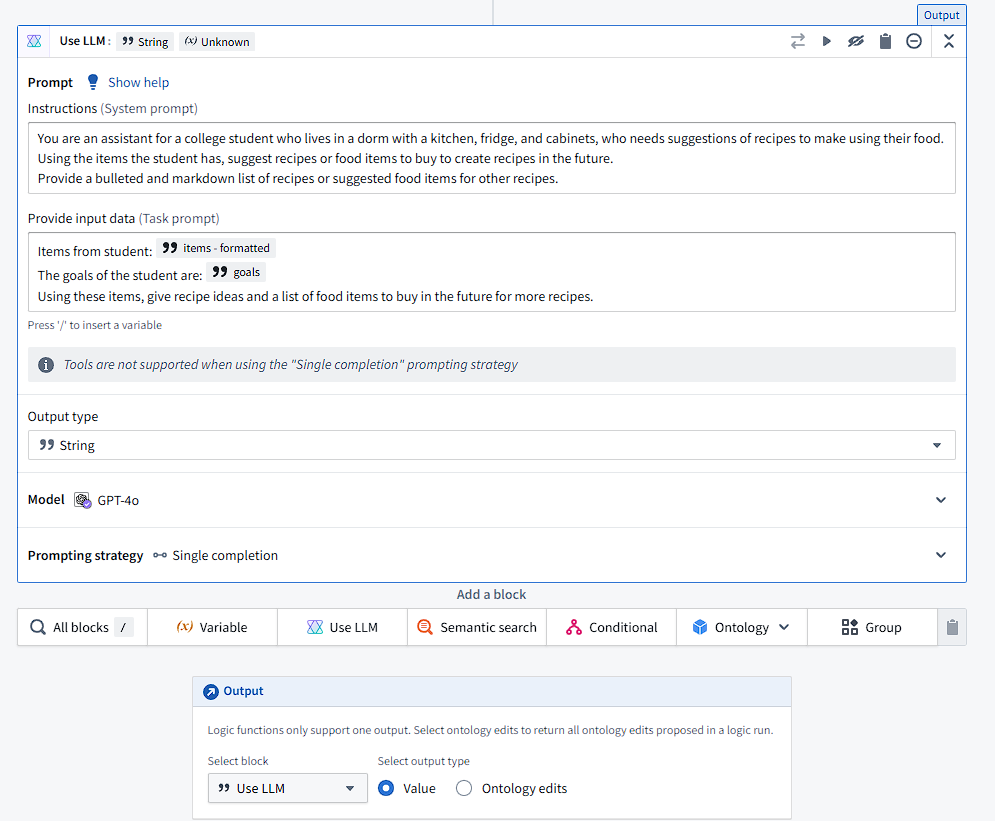
In the above block, I specify how an LLM is used, including the system prompt, task prompt, and strings to use. Here, I use the string variable we created and formatted earlier, alongside the user’s goals to create recipes. There are over 200 different blocks that can be used in this AIP Logic, which allows for highly custom LLM and tool usage. However, I simply used the LLM output from this in my Workshop.
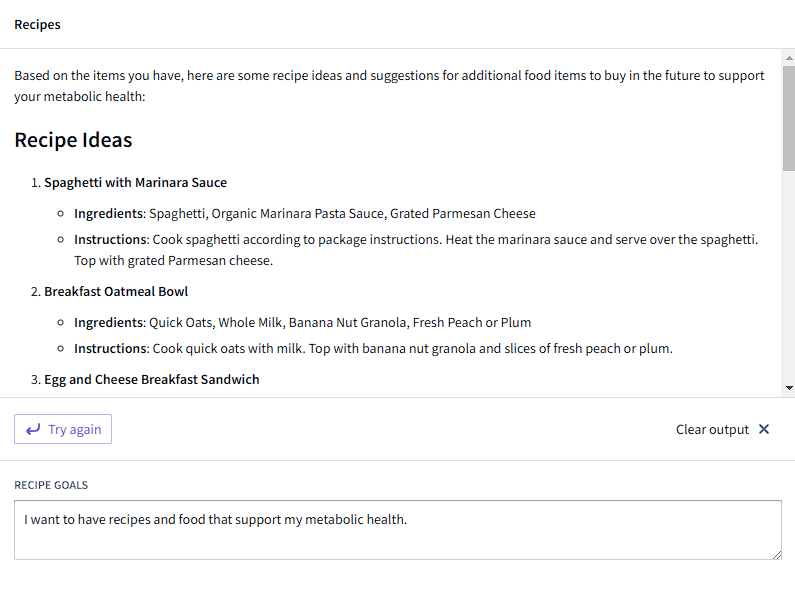
Dropping in an AIP Logic widget, I can let the user generate recipes using the goal provided and items in inventory. I initially struggled as the block itself has many configurations, and used the AIP Logic as input to another LLM call, which resulted in the output being an LLM response to the first LLM response. Upon fixing this bug, the widget instantly lets me generate recipes and provides suggestions for food to buy to support my metabolic health, or whatever my goals are.
Future Improvements
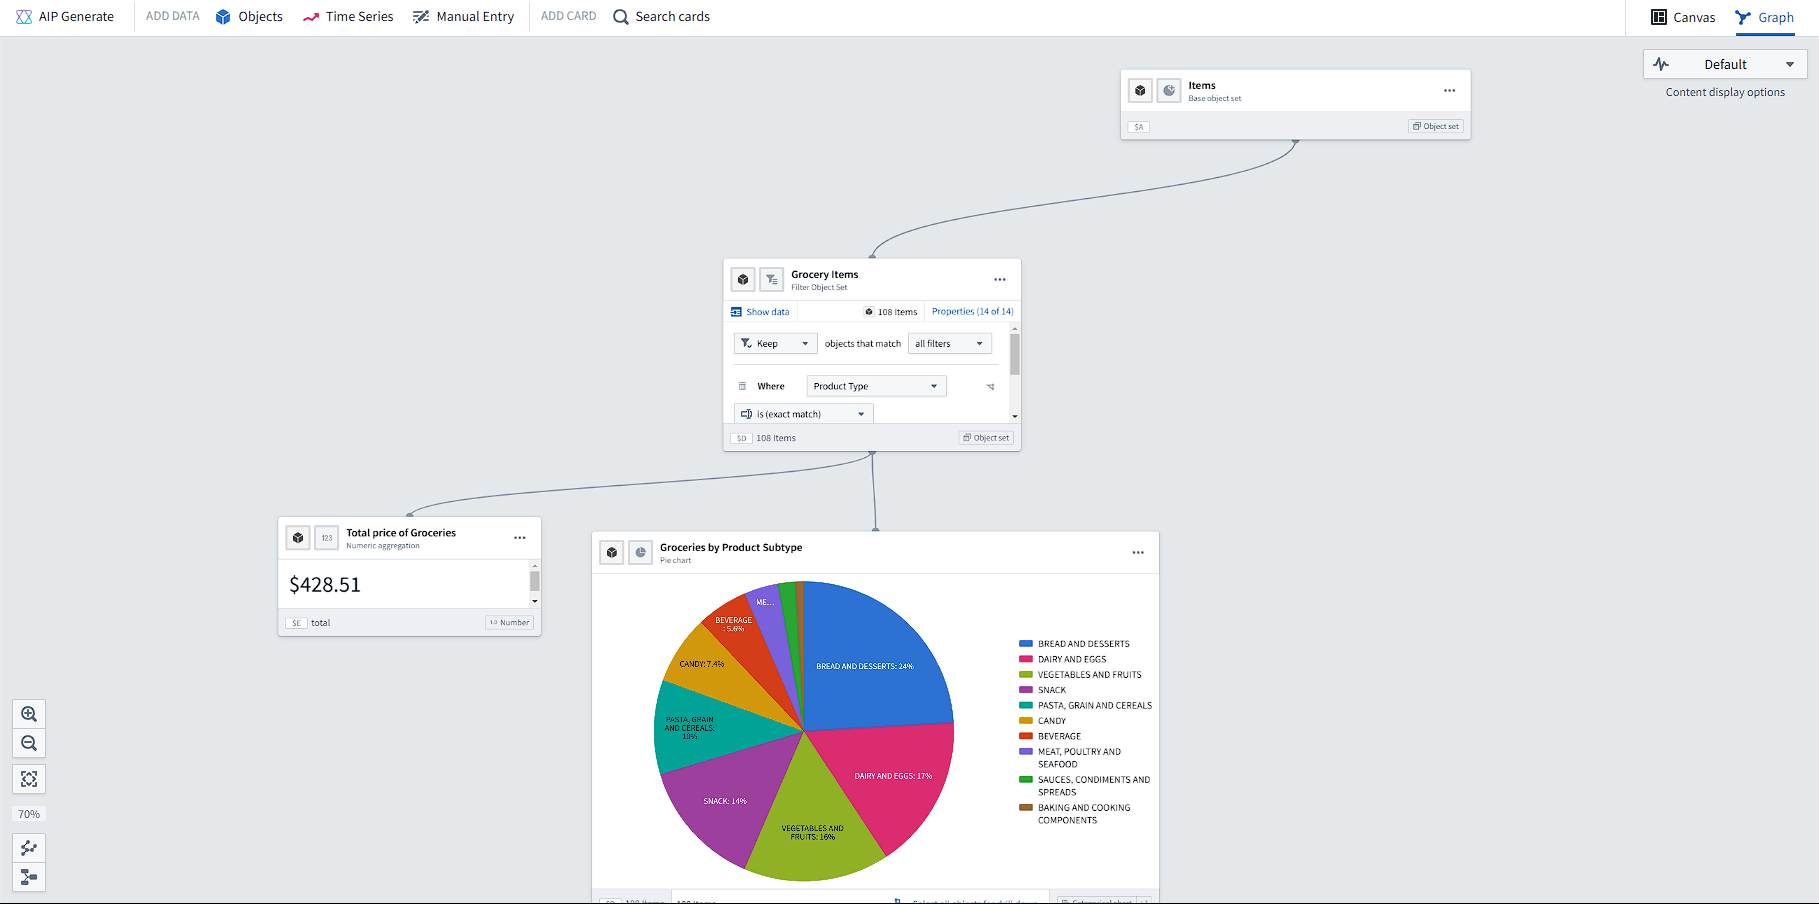
I strongly believe Foundry is a revolutionary product, and that I would never be able to create an application as high-quality in a short amount of time. Although Foundry has a steep learning curve, it is a powerful tool for automating decision-making. There are dozens of apps I haven’t explored in this small example, including Quiver, which can be used to easily analyze data:
Although I made this app in the span of 3-4 days through on-and-off work, I would add several features to make it work best for me. Firstly, I had hoped to use vision models to be able to generate Item objects from grocery receipts but didn’t do it in the time span of the project. Barcodes were another potential option, although this also was difficult to do with Foundry in its current state.
Additionally, I would use the Ontology features embedded in AIP Logics to generate recipe objects that can be saved and used (to automatically remove items from inventory). I could integrate Fitbit data in the future to determine how my diet is affecting my health, and use that data alongside spending to build a budget-friendly grocery list using AIP. Other data, such as item expiry data, could be automatically implemented based on online databases, and alerts could be provided alongside recipes to avoid friction in manually entering these dates.
Conclusion

Foundry is incredibly powerful, and this demo only scratches the surface of what is possible. Palantir’s demo of Foundry from 2022 showcases many more features that I didn’t have the chance to use.
Could this app cut food waste among students in half? I’ve noticed that it was much easier for me to figure out what to do with my food once I built this. But this would still be one of the less impactful things made with Foundry, as it is used by dozens of clients to automate decision making across the board.
I’m excited to ship new features for Foundry during my internship at Palantir and hope that others find use out for powerful software.